

You are either well versed with JavaScript now or you are bored. You can be bored with vanilla JS. Cuzz for how long one can keep making the To-Do-List app? So, now is the time you wanna get started with React.
First of all, you need to know that React is a library and not a framework. Feed this in your mind. People keep yelling "React Framework", "React Framework" but it's not. They compare it (I don't know why) with Angular which is a framework.
Before Starting
Before that, you need to know, you don't start with create react app. Because it will ruin everything for you. Not getting into the complex things but to start smooth, we'll be using Codesandbox. Just type react.new in your browser and you'll be all set. This is a shortcut to open react project in Codesandbox. Before continuing, I would suggest, you create an account on Codesandbox to keep your changes saved.
Interface
There are three columns in front of you.
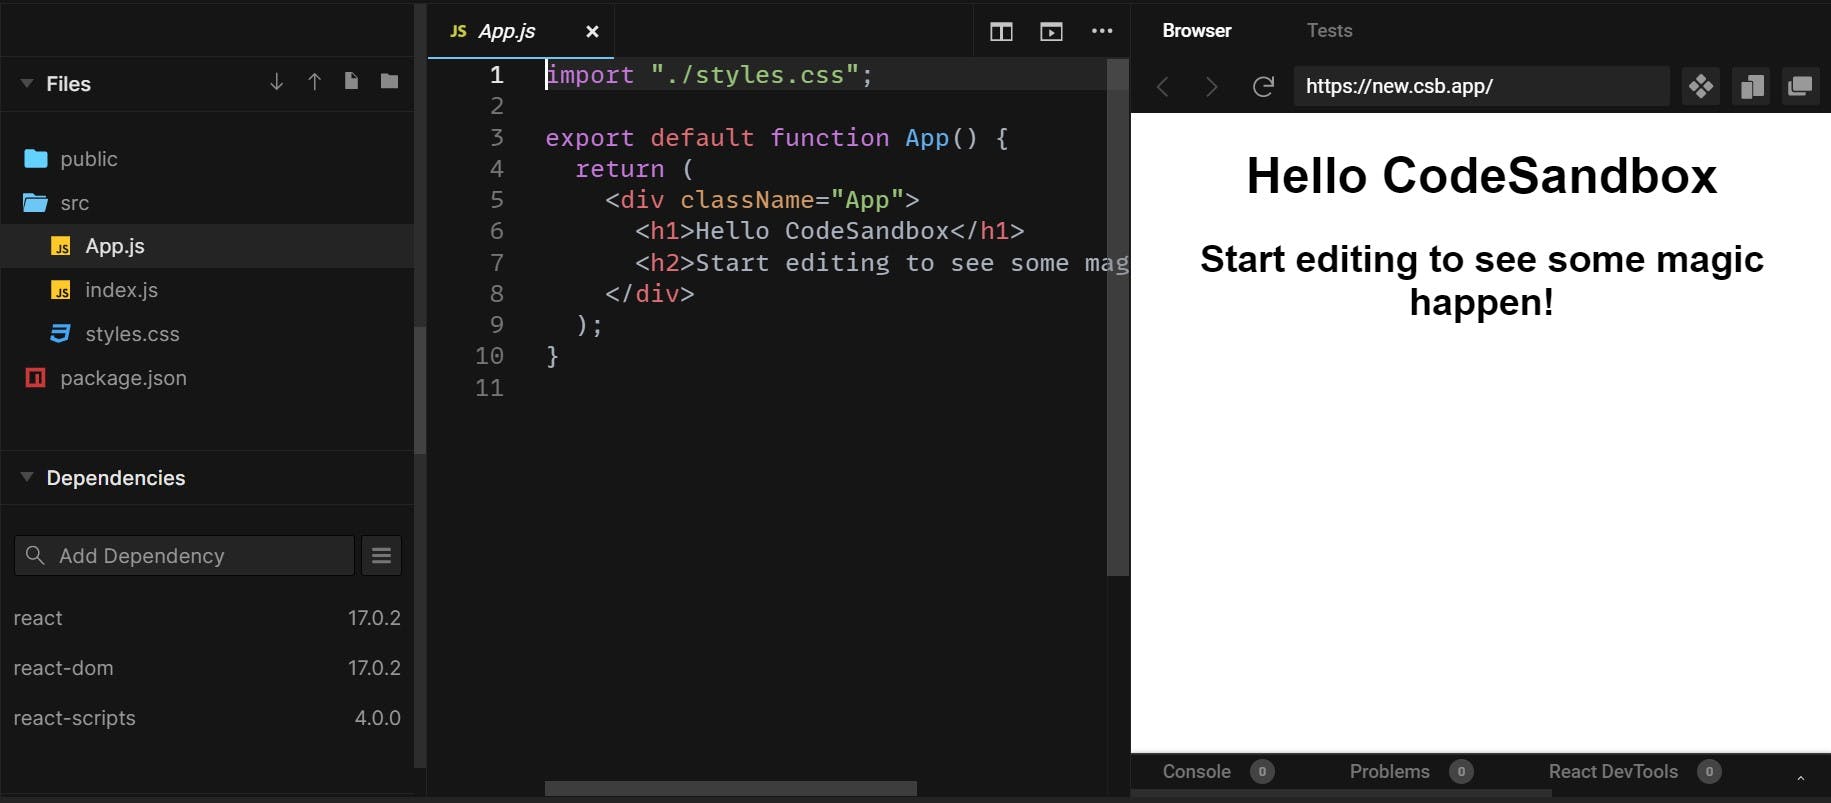
Directory
The directory consists of three main things, first the public folder having your inde.html file. Second, the src folder contains react code and the third one is package.json file which stores all the metadata related to the project. You'll learn more about it slowly when you start using react more. And then there is dependencies, which consist of all the packages installed from npm. Let's not go there for now.
Code
This area is where you edit your code. It's basically an IDE (integrated development environment).
Preview
The preview area is where you can have a preview of your application, check the console for your JavaScript logs, and also use debug tool.
Starting with React
import "./styles.css";

export default function App() {
  return (
    <div className="App">
      <h1>Hello CodeSandbox</h1>
      <h2>Start editing to see some magic happen!</h2>
    </div>
  );
}
Your IDE must be looking like this. It is the App.js file of your app. Here you write what you want to do in your application.
Code Breakdown
In line 1, there is an import of "styles.css". It is imported as a module for CSS properties. So that the CSS in that specific file can be applied to the app.
Then there is a function written which returns some HTML. That HTML is called JSX. This HTML is the code that results in your application. If you change the H1 tag to something else. The preview will also change.
Now you must be wondering what is className. Here you write className instead of class that you use in plain HTML.
Creating your first Application in React
We will be building a counter app, which will have a value and a button. On clicking that button the counter will increase by one every time. We will use React Hooks for this and not class components. Class component is an old method but we got hooks now. So we'll use state hook over here. Now let's start...
1. You need to import the state hook from React in order to use it. So write this line below the styles import.
import {useState} from 'react'
2. Now create an h3 tag and a button by writing HTML below the h2 tag.
<h3>Count: </h3>
<button>+</button>
3. Now create the hook that we imported earlier by writing this above the return statement.
import "./styles.css";
import {useState} from 'react';

export default function App() {
const [count, setCount] = useState(0)
  return (
    <div className="App">
      <h1>Hello CodeSandbox</h1>
      <h2>Start editing to see some magic happen!</h2>
      <h3>Count: </h3>
      <button>+</button>
    </div>
  );
}
State hook breakdown: We just created a const variable with two values count and setCount. The count is the variable that contains the value which we provide in the parenthesis of useState. The setCount is a function that helps you update the value that we have in count. It is not necessary to give it a name like 'x and setX', you can name both of them anything in the world and it will work fine. We name it like that under good practices and it becomes easy to identify which one is linked to which value and so.
4. Now we have created a count value so now we want to display the value in our app. To do that pass count to the h3 tag like this.
<h3>Count: {count}</h3>
This will show the value of count in your app. But you must be wondering why we are writing it in curly just curly braces and not like we used to do in JavaScript ES6 with a $ sign. This is because in JSX we write it like this and not like we used to do in JavaScript.
5. After this we don't just want to display it, we also want to increase the quantity count every time we click the button and for that, the button takes an onClick value.
<button onClick={}>+</button>
Now the onClick takes a function. So we'll use the ES6 arrow function over here.
<button onClick={()=> }>+</button>
Now we pass the hook function in it.
<button onClick={()=> setCount(count + 1)}>+</button>
We did count + 1 in the setCount because we wanted to increase the count by one whenever we click the button.
Boom we have a counter app working.
Final
I hope you got this and you have a working app now and if you don't then you can look at my code here.
Share it with people who may find it helpful. Comment your thought, I would love to read them. Like this blog for better reach.